

Introduction
If you've ever wondered how Netflix knows what movie to recommend next, how your email filters out spam, or how your phone's camera automatically detects faces—then you're already brushing up against the wonders of machine learning. But what is machine learning, really?
At its core, machine learning (ML) is a method of teaching computers to learn patterns from data and make decisions or predictions without being explicitly programmed for every single task. Instead of writing rules by hand, you feed the machine examples—and it figures out the rules on its own. Kind of like training a dog, but with data instead of treats.
Now, if you're ready to dive into the world of machine learning, there's good news: you don’t need to be a PhD in computer science or a math wizard. Thanks to the power of Python, one of the most beginner-friendly programming languages out there, getting started with machine learning is easier than ever.
Why Python? Well, it’s simple, readable, and has a massive community that loves to share code, answer questions, and build cool tools. Python has become the go-to language for data science and machine learning, and much of that popularity is thanks to the rich ecosystem of libraries available—especially the one we’re focusing on today: Scikit-learn.
Scikit-learn is a free, open-source Python library that makes it easy to build and test machine learning models. Whether you're classifying emails, predicting house prices, or clustering customers based on shopping habits, Scikit-learn gives you all the essential tools without overwhelming you with complexity. It’s like a power toolset for data—it does the heavy lifting, so you can focus on learning and experimenting.
What is Scikit-learn?
Scikit-learn (pronounced "sy-kit learn", not "sky-kit learn", in case you're wondering) is a Python library that helps you build machine learning models without having to write algorithms from scratch. It gives you pre-built tools for pretty much everything you need to get started with ML: from loading data and training models to evaluating results and tuning performance.
Let’s break down what it offers in plain English:
- Classification – Want to teach your program to sort emails into “spam” or “not spam”? That’s classification.
- Regression – Trying to predict a number, like the price of a house based on its features? That’s regression.
- Clustering – Have a bunch of customer data and want to group similar people together? That’s clustering.
- Dimensionality Reduction – Too many features (columns) in your dataset? This helps simplify things without losing too much information.
- Model Evaluation & Tuning – Once your model is built, Scikit-learn helps you figure out how good it is, and how to make it better.
And here's the best part: you don’t need to be a statistician or data engineer to use it. Scikit-learn is designed with simplicity and consistency in mind. All the tools follow the same basic structure:
- Create a model,
- Train it on your data,
- Make predictions,
- Evaluate how well it did.
This consistency means once you’ve learned how to use one type of model, like linear regression, you can apply the same steps to use a decision tree or a support vector machine. It’s like learning to drive one kind of car—after that, switching to a different model is no big deal.
Scikit-learn is also part of the broader SciPy ecosystem, which includes other helpful libraries like NumPy (for math), pandas (for data handling), and matplotlib (for plotting). Together, they form a dream team for doing real-world data science in Python.
In short: Scikit-learn is your beginner-friendly launchpad into the world of machine learning. It does the hard math behind the scenes, so you can focus on solving problems and building something useful.
Installing Scikit-learn
If you’re reading this, you probably have Python installed. Before you install Scikit, it’s recommended to set up a virtual environment. Think of a virtual environment like a little sandbox where your project lives—it keeps all your packages tidy and avoids breaking other projects.
To create one, run:
python -m venv ml-env
Activate it with:
On Windows:
ml-env\Scripts\activate
On macOS/Linux:
source ml-env/bin/activate
You’ll know it worked if you see something like (ml-env) at the start of your terminal line.
Now to install Scikit-learn (and some friends)
Run this command:
pip install scikit-learn pandas matplotlib numpy
Here’s what each package does:
- scikit-learn – Our main machine learning library
- pandas – Helps you work with datasets (think rows and columns like a spreadsheet)
- numpy – Handles the math behind the scenes
- matplotlib – Lets you plot charts to visualize your data
That’s it! You’re officially set up.
Key Concepts and Building Blocks
Before we go full speed into building models, let’s slow down for a moment and cover the basic ingredients of machine learning. Think of this as your pre-cooking prep—it’s much easier to follow a recipe once you know what each item on the counter actually does.
These are the core ideas you’ll see again and again as you work with Scikit-learn:
Datasets (a.k.a. The Raw Material)
A dataset is just a collection of data—rows and columns, like a spreadsheet. Each row represents one observation (a flower, a house, a customer), and each column is a feature about that observation.
Scikit-learn has a few built-in datasets that are perfect for learning, like:
- Iris – flower classification
- Wine – chemical properties of wines
- Diabetes – numeric prediction (regression)
- Digits – image-based classification
These datasets are small, clean, and ready to use—no cleaning required.
Features and Labels
This is probably the most important concept to understand in ML:
- Features are the inputs. These are the pieces of information your model uses to learn, like age, height, temperature, or price.
- Labels (also called targets or outputs) are what you're trying to predict. For example:
- Predicting house price → features = size, location, age, label = price
- Predicting flower species → features = petal size, label = species
In code, features usually go into a variable like X, and labels go into y.
Train-Test Split
To see how well your model performs, you need to test it on data it hasn’t seen before. That’s where splitting comes in.
- Training data is used to teach the model.
- Testing data is used to check how well it learned.
This helps you avoid a big mistake called overfitting, where your model memorizes the training data but fails miserably on new data.
Scikit-learn makes this easy with:
We learned about features and variables earlier, and we’ll use them here
- X represents your features (input data)
- y represents your labels (what you’re trying to predict)
- X_train – The parts of X used for training the models.
- X-test – The parts of X used to test the models.
- y_train – The matching labels for X_train.
- y_test - The matching labels for x_test.
By default, it splits your data 75% for training and 25% for testing. Let’s look at a more refined version of this:
- Test_size=0.2 means 20% of the data goes into the test set (and 80% into training). You can also use 0.3 for 30%, etc.
- random_state=42 Sets a seed for randomness, so your split is the same every time you run it (makes experiments reproducible). You can use any number here.
- shuffle=True Shuffles the data before splitting. You almost always want this to avoid patterns in your dataset messing things up.
Create a Model
Once you’ve got your data ready and split into training and test sets, it’s time to build the brains of the operation: the model.
Scikit-learn makes creating models easy—there’s no manual math, no reinventing the wheel. You just pick the algorithm you want and use it like a plug-and-play tool.
Here’s the basic pattern:
For Example:
This line says:
“Hey Scikit-learn, I want a logistic regression model. Let’s call it model.”
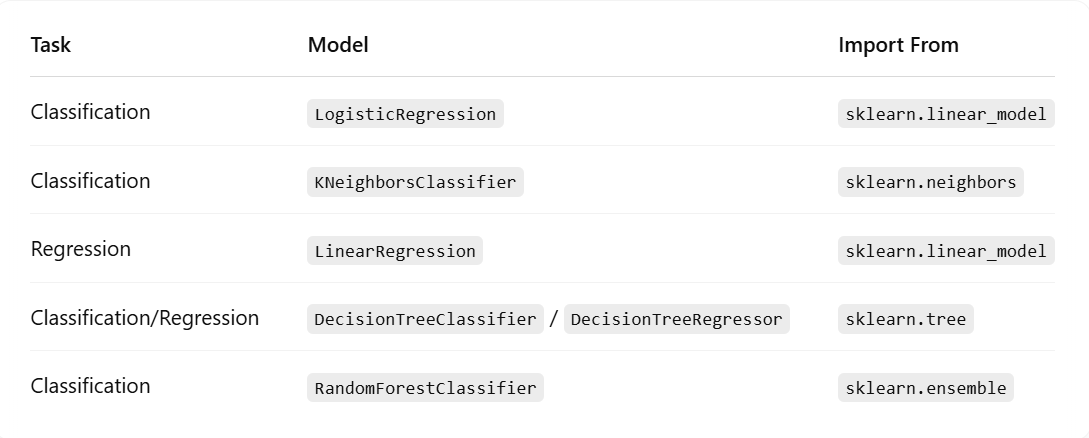
You can do this with all kinds of algorithms. Here are some common ones and where they live in Scikit-learn:
Hyperparameters
Most models have hyperparameters—these are settings you can tweak before training the model (like how many neighbours to use in KNN or how deep to grow a decision tree).
You can think of them as the model’s control knobs. Scikit-learn gives you tools to help find the best combo of these knobs.
Sklearn.model_selection helps you choose the best parameters where applicable.
You can check out the documentation here.
Model Training and Predictions
Once you’ve picked a model (like KNN, decision tree, etc.), training and prediction usually follow the same pattern:
Model Evaluations
How do you know if your model is any good?
You use evaluation metrics. The simplest one is accuracy, which just means “how many predictions did the model get right?”
Scikit-learn has built-in tools for this too:
There are also more advanced metrics like precision, recall, F1-score, and confusion matrices—but don’t worry, we’ll get to those later.
One of the coolest things about Scikit Learn is that almost every model—no matter how complex—uses the same basic steps:
- fit() to train
- predict() to make predictions
- score() or metric functions to evaluate
Choose Your Playground
You’ll want a nice place to write and run your Python code. Here are a few options:
- Jupyter Notebook (Recommended for beginners)
- Run pip install notebook then jupyter notebook.
- Great for experimenting and seeing your code/results step by step
- Google Collab (Nothing to install!)
- Go to colab.research.google.com
- It’s like Jupyter, but in the cloud—perfect if you don’t want to mess with setup
- VSCode or PyCharm
- Great once you’re more comfortable with Python and want a more robust editor.
Now to test it out:
Open your Python environment (Jupyter, Colab, or terminal) and run:
If it prints a number like 1.4.0 or similar, congratulations- you’re ready to roll.
Your First Machine Learning Model (No Math Required)
Alright, time for the fun part: actually building a machine learning model! Don't worry—we’re not diving into pages of equations. Instead, we’re going to follow a simple recipe and let Scikit-learn do the heavy lifting.
What are we building?
We’ll build a simple model that can look at the measurements of a flower and predict what kind of flower it is. Specifically, we’ll use the Iris dataset—a classic in the machine learning world.
The Iris dataset is like the "Hello, World!" of ML projects. It contains 150 rows of flower data. Each flower has four features:
- Sepal length
- Sepal width
- Petal length
- Petal width
…and we’re going to predict the species of the flower based on those features.
Step by Step: Let’s Code!
Open up your favourite coding environment (Jupyter Notebook, Google Colab, etc.) and follow along.
Import The Tools We’ll Need
Load the Iris Dataset
Split the Data into Training and Test Sets
We’ll use 80% of the data to train the model, and 20% to test how well it performs.
Create the Model
We’ll use a K-Nearest Neighbors (KNN) model. It’s simple and surprisingly effective.
Train the Model
This is where the "learning" happens.
Make Predictions
Now we ask our model to predict the species of the flowers in the test set.
Check How Accurate It Is
Let’s see how many it got right.
You should see something like Accuracy: 1.00 or 0.97. That means the model got 97–100% of predictions right—not bad for your first try!
For more ways you can evaluate your data model, check out this article.
Evaluating Your Model
Sometimes, you need a more detailed report on how well your model is performing—like whether it’s better at catching the rain or avoiding false alarms. That’s where Accuracy, Precision, Recall, and F1-Score come in.
Essentially,
- Accuracy – How often is the model correct?
- Precision – When the model says “Yes”, How often is it right?
- Recall(Sensitivity) – Out of all the actual “yes” cases, how much did the model catch?
- F-1 score – A balance between Precision and Recall.
- Confusion Matrix – A little table that shows what the model got right and wrong.
Conclusion
Congratulations! You've just taken your first steps into the world of machine learning using Scikit-learn, one of the most powerful tools available for building and evaluating models. From understanding key concepts like training and testing data to diving into more advanced topics like cross-validation and hyperparameter tuning, you've learned how to build, test, and improve your models in a way that's both structured and efficient.
But remember, this is just the beginning! The world of machine learning is vast and constantly evolving. The key is to keep experimenting, learning, and iterating.
So, don’t be afraid to dive deeper. Play with more datasets, explore new models, and start solving real-world problems. With Scikit-learn in your toolkit, you're well-equipped to continue your journey into the exciting world of machine learning.
If you’re just beginning your data science journey and looking for structured guidance, check out our Beginner’s Course in Data Science designed specifically to help you go from zero to confident with tools like Python, Scikit-learn, and more.
Happy coding, and good luck on your machine-learning adventure!
.jpeg)


.avif)
